Disclaimer
เนื้อหาต่อไปนี้เป็นการสรุปความรู้ที่ได้จากการเรียนคอร์สออนไลน์ใน Linkedin Learning หัวข้อ React: Design Patterns ของคุณ Shaun Wassell
Design Pattern สำหรับ React เป็นยังไง ?
ถ้าพูดถึง Design Pattern แล้วปกติเราจะนึกถึง Gang of Four OOP Design Patterns (Creational patterns, Structural patterns etc.) แต่สำหรับ React แล้วเราจะพูดถึง pattern ที่สามารถแก้ปัญหาที่พบได้บ่อย ๆ (Common Challenges) ในการใช้งาน React ได้อย่างมีประสิทธิภาพ หรือกล่าวคือ
The patterns we cover here are effective solutions to some extremely common challenge in React.
โดย Common Challenges หลัก ๆ ที่เราจะพูดถึงจะมี
การสร้าง reuseable layouts
การ reusing โลจิคที่ซับซ้อน (complex logic) ระหว่าง components หลาย ๆ ตัว
การจัดการกับ Form Input อย่างมีประสิทธิภาพ
การนำ functional concepts มาใช้งานกับ React
1. Layout components
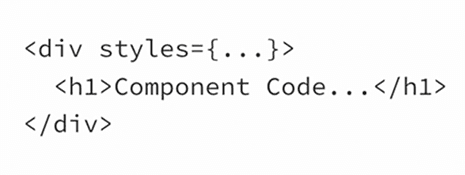
Layout component ก็คือ component ใน React ที่ใช้ในการจัดเรียง (arranging) components ตัวอื่น ๆ ใน page ตัวอย่างเช่น สมมุติเราต้องการสร้าง component นึงโดยมีการทำ styling ให้ตัว component ด้วย code ที่ออกมาจะเป็นประมาณนี้
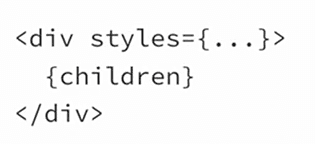
เราสามารถแยกส่วนของ div ที่ใส่ style ออกมาเป็น Layout Component ได้ดังนี้
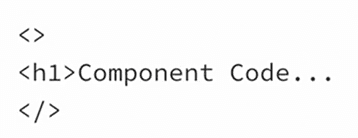
ดังนั้นตัว Component จริง ๆ ของเราก็จะเป็น
โดยสรุปแล้วไอเดียของ Layout Component คือ Component ที่ครอบ Component ตัวอื่นอยู่โดยทำให้ตัว Component ที่ถูกครอบอยู่ไม่จำเป็นต้องสนตำแหน่งของตัวมันเองว่าอยู่ที่ไหนใน page
ตัวอย่างของ Layout component ที่เราจะพูดถึงจะมี
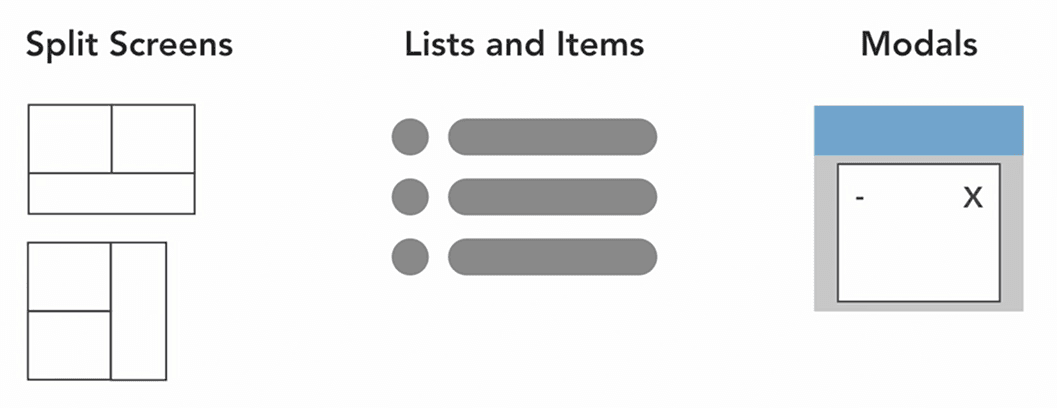
Split Screens
ตัวอย่างแรกคือ SplitScreen Component ไอเดียคือเราจะให้ Component นี้เป็นตัว แบ่ง Component ลูก 2 ตัวเป็น Left และ Right Component ใน page โดยให้มีความยาวแบ่งเป็นสัดส่วนตาม Weight ที่ระบุ
<SplitScreen leftWeight={1} rightWeight={3}>
  <LeftHandComponent />
  <RightHandComponent />
</SplitScreen>

SplitScreen.js
import styled from 'styled-components';

const Container = styled.div`
  display: flex;
`;

const Pane = styled.div`
  flex: ${(props) => props.weight};
`;

export const SplitScreen = ({ children, leftWeight = 1, rightWeight = 1 }) => {
  const [left, right] = children;
  return (
    <Container>
      <Pane weight={leftWeight}>{left}</Pane>
      <Pane weight={rightWeight}>{right}</Pane>
    </Container>
  );
};
Lists and list items
ตัวอย่างนี้จะเป็นการสร้าง RegularList Component ที่ render list ของ item ได้หลายแบบตาม prop ที่เราส่ง สมมุติว่าเรามี array ของ people ดังนี้
const people = [
  {
    name: 'John Doe',
    age: 54,
    hairColor: 'brown',
    hobbies: ['swimming', 'bicycling', 'video games'],
  },
  {
    name: 'Brenda Smith',
    age: 33,
    hairColor: 'black',
    hobbies: ['golf', 'mathematics'],
  },
  {
    name: 'Jane Garcia',
    age: 27,
    hairColor: 'blonde',
    hobbies: ['biology', 'medicine', 'gymnastics'],
  },
];
และเรามี Component ที่ใช้แสดงแต่ละ item ของ people array (หรือกล่าวคือแต่ละ person) อยู่ 2 แบบคือ SmallPersonListItem
export const SmallPersonListItem = ({ person }) => {
  const { name, age } = person;

  return (
    <p>
      Name: {name}, Age: {age} years
    </p>
  );
};
ใช้แสดง name และ age ของ person แบบ inline
และ LargePersonListItem
export const LargePersonListItem = ({ person }) => {
  const { name, age, hairColor, hobbies } = person;

  return (
    <>
      <h3>{name}</h3>
      <p>Age: {age} years</p>
      <p>Hair Color: {hairColor}</p>
      <h3>Hobbies:</h3>
      <ul>
        {hobbies.map((hobby) => (
          <li key={hobby}>{hobby}</li>
        ))}
      </ul>
    </>
  );
};
ที่ใช้แสดงข้อมูลของ person ทั้งหมด
เราสามารถ implement ตัว RegularList Component ได้ดังนี้
export const RegularList = ({
  items,
  resourceName,
  itemComponent: ItemComponent,
}) => {
  return (
    <>
      {items.map((item, i) => (
        <ItemComponent key={i} {...{ [resourceName]: item }} />
      ))}
    </>
  );
};
คือรับ props เป็น
items - person array
resourceName - ชื่อของ prop ที่แต่ละ item จะถูกส่งเข้าไปใน ItemComponent
itemComponent - ตัว Component ที่ใช้แสดงแต่ละ Item
การใช้งานก็เป็นดังนี้
   <RegularList
      items={people}
      resourceName="person"
      itemComponent={SmallPersonListItem} />
    <RegularList
      items={people}
      resourceName="person"
      itemComponent={LargePersonListItem}
จะออกมาเป็น
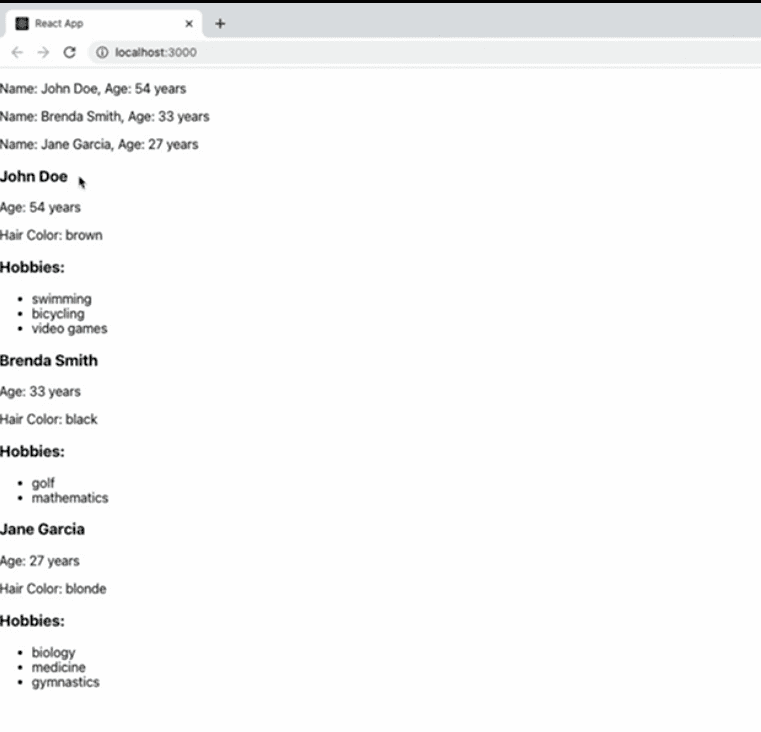
จะเห็นได้ว่าเราสามารถใช้ RegularList Component ชนิดเดียวแสดง item ได้หลายแบบ
Modal components
Modal ก็ถือว่าเป็น Layout Component ชนิดหนึ่ง ตัวอย่างการ implement Modal แบบหนึ่ง
import { useState } from 'react';
import styled from 'styled-components';
const ModalBackground = styled.div`
position: fixed;
z-index: 1;
left: 0;
top: 0;
width: 100%;
height: 100%;
overflow: auto;
background-color: rgba(0, 0, 0, 0.5);
`;
const ModalBody = styled.div`
background-color: white;
margin: 10% auto;
padding: 20px;
width: 50%;
`;
export const Modal = ({ children }) => {
const [shouldShow, setShouldShow] = useState(false);
return (
<>
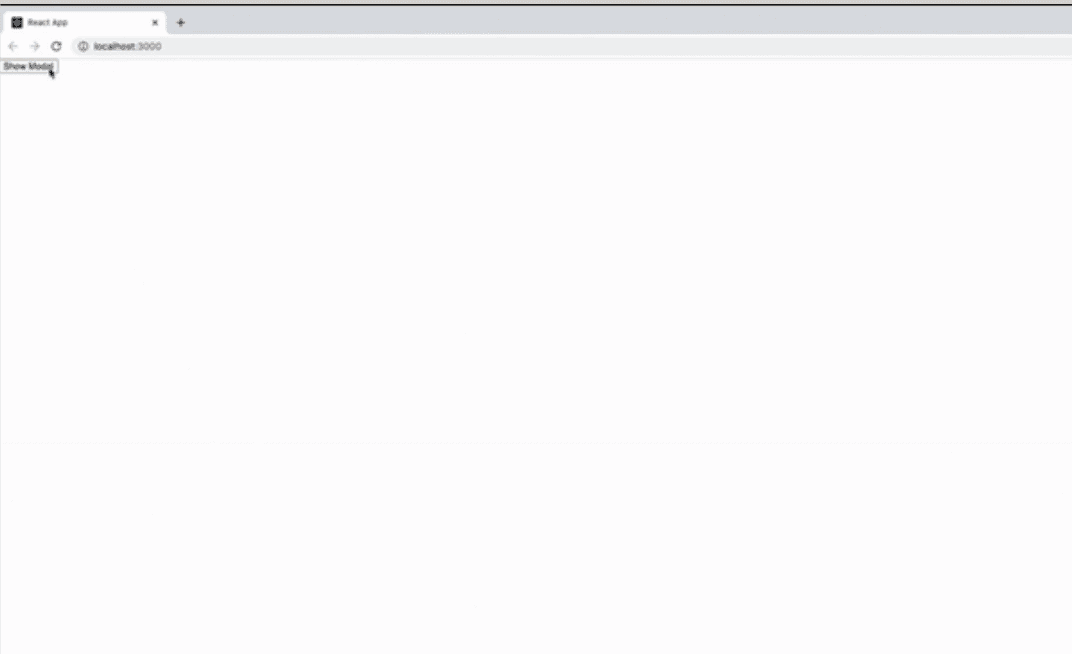
<button onClick={() => setShouldShow(true)}>Show Modal</button>
{shouldShow && (
<ModalBackground onClick={() => setShouldShow(false)}>
<ModalBody onClick={(e) => e.stopPropagation()}>
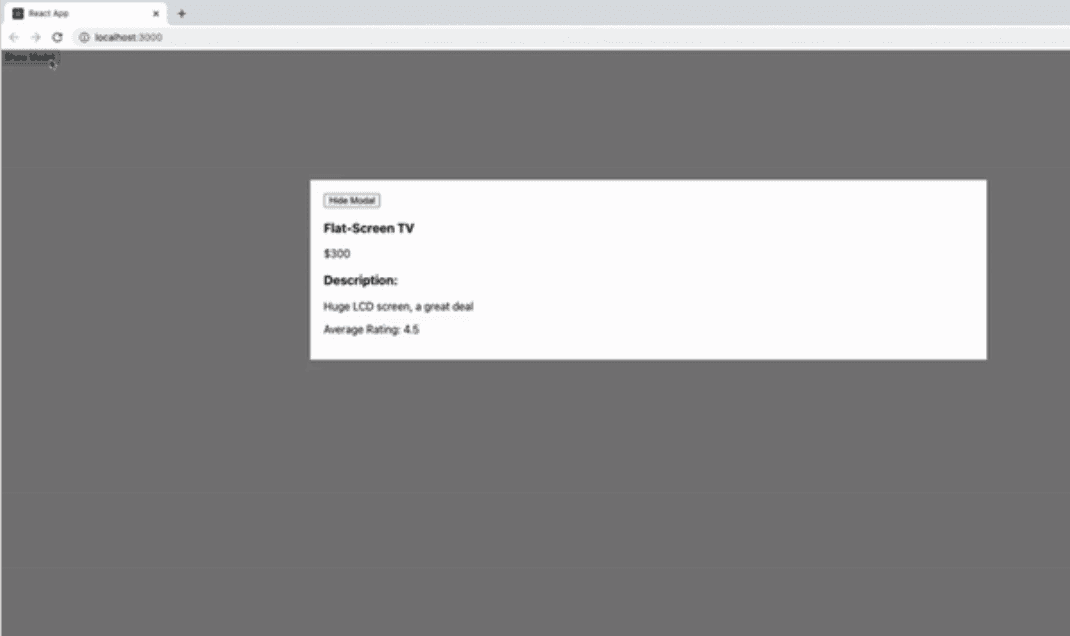
<button onClick={() => setShouldShow(false)}>Hide Modal</button>
{children}
</ModalBody>
</ModalBackground>
)}
</>
);
};
ใช้งานโดยส่ง Component ที่อยากให้โชว์ใน Modal เป็น Child Component
<Modal>
  <LargeProductListItem product={products[0]} />
</Modal>
โดย Child Component จะแสดงเมื่อคลิกปุ่ม Show modal
2. Container Components
Container Components คือ Component ที่จัดการพวก data loading ให้ Child Components ตัวอย่างเช่นเรามี ContainerComponent ที่มี Child ดังนี้
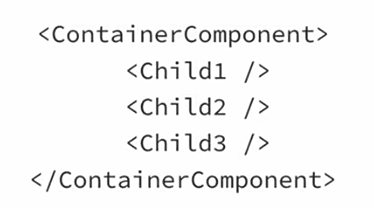
โดยแต่ละ Child จะมีการ fetch data จากภายนอก
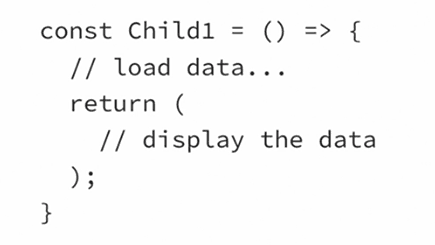
ซึ่งปัญหาก็คือบางทีเราก็ต้องการที่จะ reuse logic ในการ fetch data ไปใช้กับ Child ตัวอื่นด้วย
ตัว ContainerComponent สามารถช่วยแก้ปัญหานี้ได้โดยดึง logic การ fetch data ออกมาจาก Child มาใส่ในตัวเองแทน
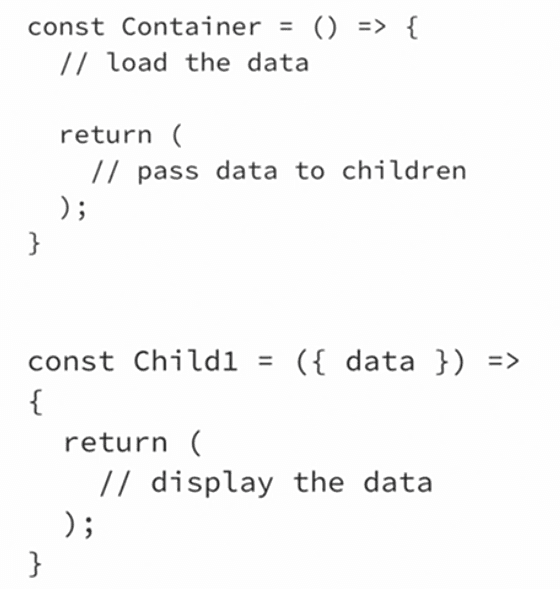
สรุปแล้วไอเดียของ Container Component คือ Component ที่ครอบ Component ตัวอื่นอยู่โดยทำการ fetch และส่ง data ให้ ทำให้ตัว Component ที่ถูกครอบอยู่ไม่จำเป็นต้องรู้ว่า data ที่ได้รับนั้นถูก fetch มาจากไหน
ตัวอย่างของ Container Component ประเภทต่าง ๆ
ResourceLoader Component
ResourceLoader คือจะเป็น Component ที่ fetch data จาก url ที่กำหนด (resourceUrl) และส่งให้ Child Component เป็น prop ที่มีชื่อที่แตกต่างกันได้ตามกำหนด (resourceName)
import React, { useState, useEffect } from 'react';
import axios from 'axios';

export const ResourceLoader = ({ resourceUrl, resourceName, children }) => {
  const [state, setState] = useState(null);

  useEffect(() => {
    (async () => {
      const response = await axios.get(resourceUrl);
      setState(response.data);
    })();
  }, [resourceUrl]);

  return (
    <>
      {React.Children.map(children, (child) => {
        if (React.isValidElement(child)) {
          return React.cloneElement(child, { [resourceName]: state });
        }

        return child;
      })}
    </>
  );
};
การใช้งานเช่น
		<ResourceLoader resourceUrl="/users/123" resourceName="user">
			<UserInfo />
		</ResourceLoader>
		<ResourceLoader resourceUrl="/products/1234" resourceName="product">
			<ProductInfo />
		</ResourceLoader>
โดย UserInfo จะรับ data เป็น prop ชื่อ user และ ProductInfo จะรับ data เป็น prop ชื่อ product เป็นต้น
DataSource Component
DataSource Component จะคล้าย ๆ กับ ResourceLoader Component แต่แทนที่เราจะกำหนดตัว url ที่จะ fetch เราจะสามารถกำหนด function ที่ใช้ในการ fetch เองได้เลย (getDataFunc) ทำให้มีความ flexible มากขึ้น
import React, { useState, useEffect } from 'react';

export const DataSource = ({
  getDataFunc = () => {},
  resourceName,
  children,
}) => {
  const [state, setState] = useState(null);

  useEffect(() => {
    (async () => {
      const data = await getDataFunc();
      setState(data);
    })();
  }, [getDataFunc]);

  return (
    <>
      {React.Children.map(children, (child) => {
        if (React.isValidElement(child)) {
          return React.cloneElement(child, { [resourceName]: state });
        }

        return child;
      })}
    </>
  );
};
การใช้งานก็จะต้องส่ง callback function ในการ fetch data ไปยัง getDataFunc prop
const getServerData = url => async () => {
	const response = await axios.get(url);
	return response.data;
}
...
...
return (
		<DataSource getDataFunc={getServerData('/users/123')} resourceName="user">
			<UserInfo />
		</DataSource>
    )
3. Controlled and Uncontrolled Components
Concept คร่าว ๆ ของ Controlled และ Uncontrolled Components กล่าวได้คือ
Controlled Component เป็น Component ที่ state ของมันถูก control ด้วย parent จากการส่ง prop มา
Uncontrolled Component เป็น Component ที่มี state ของตัวเอง ไม่ได้มันถูก control ด้วยการส่ง prop จาก parent
Uncontrolled forms
ตัวอย่าง Uncontrolled Components ที่เป็น input ใน form
import React from 'react';

export const UncontrolledForm = () => {
  const nameInput = React.createRef();
  const ageInput = React.createRef();
  const hairColorInput = React.createRef();

  const handleSubmit = (e) => {
    console.log(nameInput.current.value);
    console.log(ageInput.current.value);
    console.log(hairColorInput.current.value);
    e.preventDefault();
  };

  return (
    <form onSubmit={handleSubmit}>
      <input name="name" type="text" placeholder="Name" ref={nameInput} />
      <input name="age" type="number" placeholder="Age" ref={ageInput} />
      <input
        name="hairColor"
        type="text"
        placeholder="Hair Color"
        ref={hairColorInput}
      />
      <input type="submit" value="Submit" />
    </form>
  );
};
จะเห็นได้ว่าเราจะดึง value ของ input ได้ด้วยการใช้ React Refs
Controlled forms
ตัวอย่าง Controlled Components ที่เป็น input ใน form
import { useState, useEffect } from 'react';

export const ControlledForm = () => {
  const [nameInputError, setNameInputError] = useState('');
  const [name, setName] = useState('');
  const [age, setAge] = useState();
  const [hairColor, setHairColor] = useState('');

  useEffect(() => {
    if (name.length < 2) {
      setNameInputError('Name must be two or more characters');
    } else {
      setNameInputError('');
    }
  }, [name]);

  return (
    <form>
      {nameInputError && <p>{nameInputError}</p>}
      <input
        name="name"
        type="text"
        placeholder="Name"
        value={name}
        onChange={(e) => setName(e.target.value)}
      />
      <input
        name="age"
        type="number"
        placeholder="Age"
        value={age}
        onChange={(e) => setAge(Number(e.target.value))}
      />
      <input
        name="hairColor"
        type="text"
        placeholder="Hair Color"
        value={hairColor}
        onChange={(e) => setHairColor(e.target.value)}
      />
      <button>Submit</button>
    </form>
  );
};
จะเห็นได้ว่า value ของแต่ละ input จะถูกเก็บเป็น state ที่ระดับ parent ของตัว input
4. Higher-Order Components
Higher-Order Components หรือ HOCs เป็น component ที่ ไม่ได้ return ค่า JSX แต่ return Component อีกตัวมาแทน
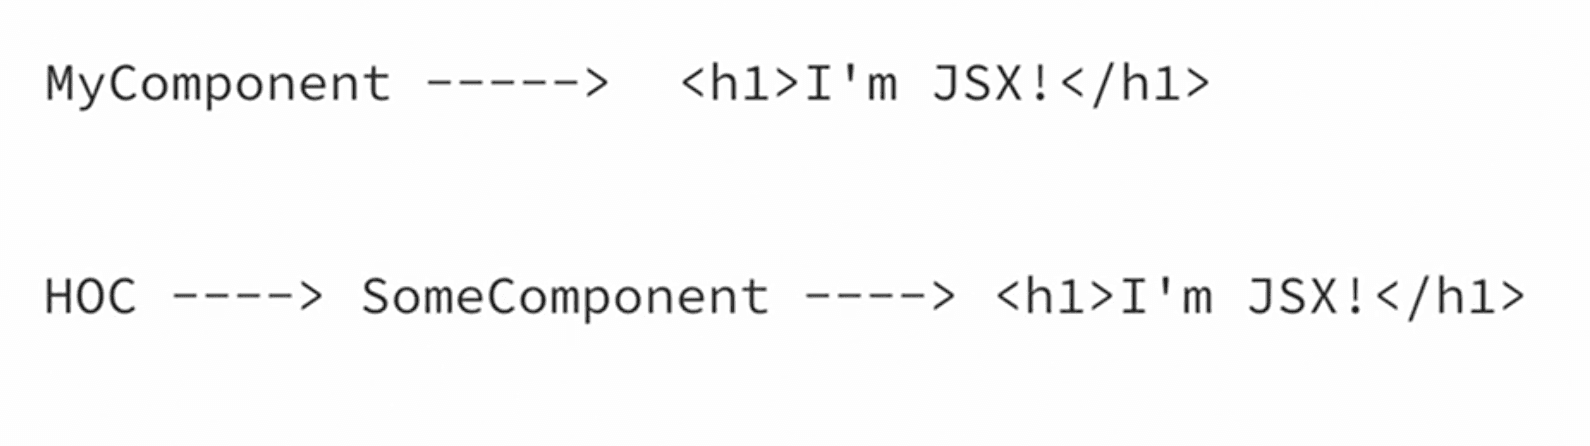
โดย HOCs จริง ๆ แล้วก็คือแค่ function ธรรมดาอันนึงนั่นเอง โดย HOCs นั่นจะใช้เพื่อ
แชร์ complex behavior ระหว่างหลาย ๆ Components (คล้าย ๆ Container Component)
เพื่อเพิ่ม fuctionality เพิ่มเติมให้ Component ที่มีอยู่แล้ว
Printing Props with HOCs
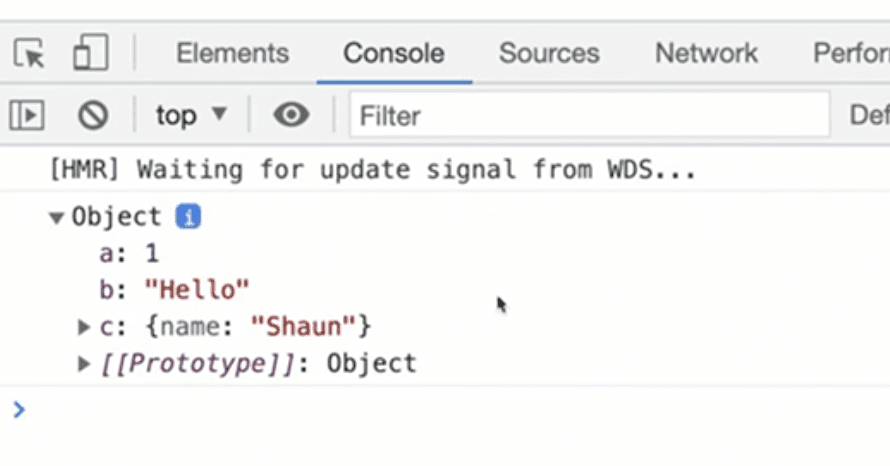
ตัวอย่างนี้เป็น HOCs ที่ทำการ print props ของ Component ออกมา
export const printProps = (Component) => {
  return (props) => {
    console.log(props);

    return <Component {...props} />;
  };
};
ตัวอย่างการใช้งาน
const UserInfoWrapped = printProps(UserInfo);

function App() {
  return <UserInfoWrapped a={1} b="Hello" c={{ name: 'Shaun' }} />;
}
Loading Data with HOCs
HOCs นี้จะทำการ fetch data และส่งเป็น prop ให้ Component
ตัวอย่าง HOCs ที่ทำการ fetch user data แล้วส่งเป็น user prop ให้ Component
import React, { useState, useEffect } from 'react';
import axios from 'axios';

export const withUser = (Component, userId) => {
  return (props) => {
    const [user, setUser] = useState(null);

    useEffect(() => {
      (async () => {
        const response = await axios.get(`/users/${userId}`);
        setUser(response.data);
      })();
    });

    return <Component {...props} user={user} />;
  };
};
การใช้งาน
const UserInfoWithLoader = withUser(UserInfo, '234');

function App() {
  return <UserInfoWithLoader />;
}
5. Custom Hooks Pattern
Custom Hooks คือ React Hook ที่เราสร้างขึ้นมาเองนอกเหนือจาก React Hook ที่มีอยู่แล้ว (useState, useEffect etc.)
ตัวอย่างเช่น useProducts Hook เป็น Hook ที่ทำตัวเหมือน useState แต่มีการ fetch product data มาเก็บไว้ใน state ด้วย
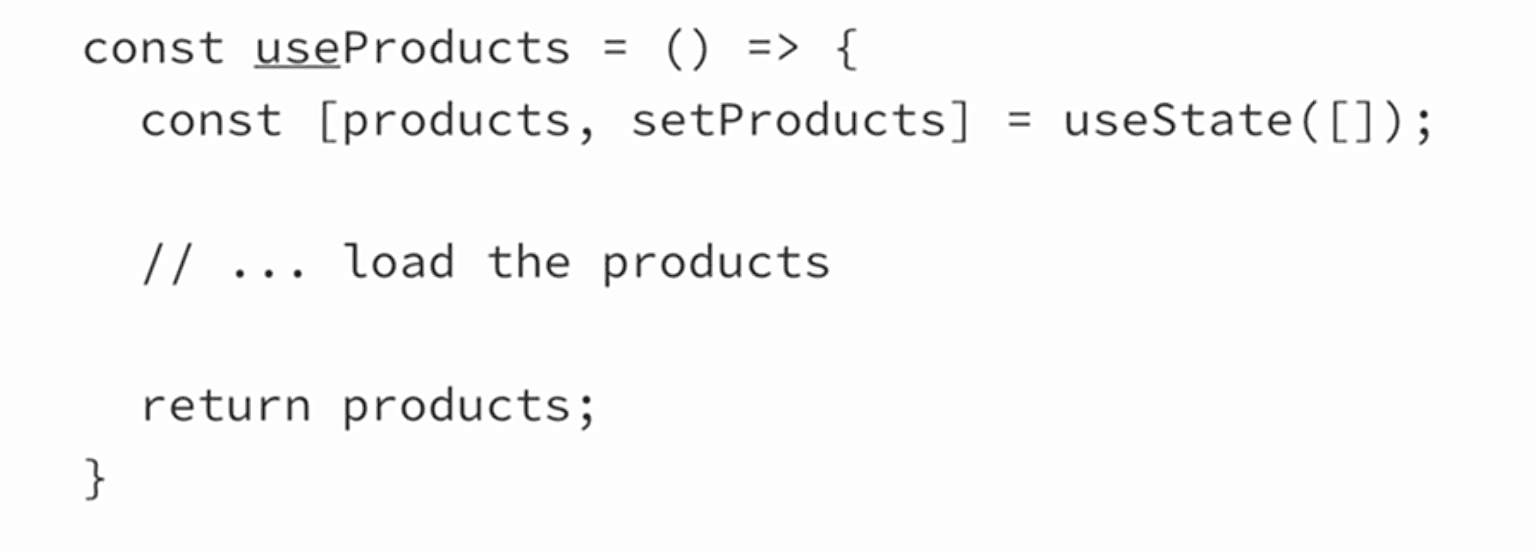
สังเกตุว่า custom hook เราจะตั้งชื่อขึ้นต้นด้วย use เสมอ
การใช้งานก็จะเรียกเหมือน React Hook ทั่วไป

โดยสรุป Custom Hooks จะใช้เพื่อ
แชร์ complex behavior ระหว่างหลาย ๆ Components (คล้าย ๆ Container Component กับ HOCs)
ตัวอย่าง Custom Hooks ประเภทต่าง ๆ
useResource Hook
useDataSource Hook
6. Functional Programming and React
การใช้คอนเซปของ Functional Programming ร่วมกับ React นั้นจะเห็นได้จากหลักการของ
Controlled Components
Function Components
Higher-order Components
Recursive Components
Component Composition
Partially appiled components
ซึ่ง 3 อันแรกเราได้พูดถึงไปแล้ว ดังนั้นเราจะมาดูตัวอย่างของ 3 อันหลังกัน
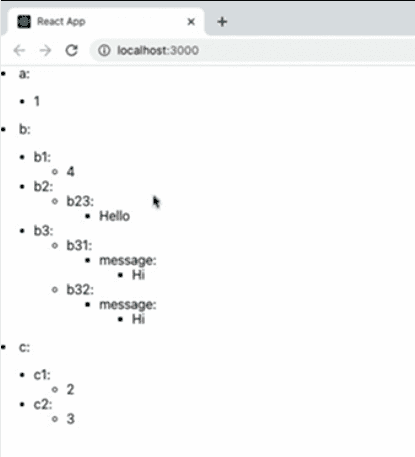
Recursive Components
Recursive Components คือ Component ที่มีการเรียกตัวเองข้างในตัวของมันเอง
ตัวอย่างเช่น สมมุติให้เรามี Data Object ชื่อ nestedObject เป็น Object ที่มี Object ซ้อนอีกทีดังนี้
const nestedObject = {
  a: 1,
  b: {
    b1: 4,
    b2: {
      b23: 'Hello',
    },
    b3: {
      b31: {
        message: 'Hi',
      },
      b32: {
        message: 'Hi',
      },
    },
  },
  c: {
    c1: 2,
    c2: 3,
  },
};
เราสามารถเขียน Recursive Component เพื่อทำการแสดง data ใน nestedObject ได้ดังนี้
const isObject = (x) => typeof x === 'object' && x !== null;

export const RecursiveComponent = ({ data }) => {
  if (!isObject(data)) {
    return <li>{data}</li>;
  }

  const pairs = Object.entries(data);

  return (
    <>
      {pairs.map(([key, value]) => (
        <li>
          {key}:
          <ul>
            <RecursiveComponent data={value} />
          </ul>
        </li>
      ))}
    </>
  );
};
จะได้ออกมาเป็น
Component composition
Component composition คือคอนเซปของการที่เราสามารถสร้าง Component หนึ่ง ๆ ได้หลาย ๆ เวอร์ชั่น โดยการเรียกใช้ Component ที่มี prop ต่างกัน
ตัวอย่างเช่น สมมุติเรามี Button Component ที่ implement ดังนี้
export const Button = ({ size, color, text, ...props }) => {
  return (
    <button
      style={{
        padding: size === 'large' ? '32px' : '8px',
        fontSize: size === 'large' ? '32px' : '16px',
        backgroundColor: color,
      }}
      {...props}
    >
      {text}
    </button>
  );
};
เราสามารถสร้าง Button ได้หลายรูปแบบโดยการส่ง prop เช่น color size ที่แตกต่างกันเกิดเป็น Button ที่เฉพาะเจาะจงเช่น DangerButton, BigSuccessButton
export const DangerButton = (props) => {
  return <Button {...props} color="red" />;
};

export const BigSuccessButton = (props) => {
  return <Button {...props} size="large" color="green" />;
};
Partially Applied Components
Partially Applied Components จะคล้าย ๆ กับ Component composition จะอยู่ในรูปของ HOCs
ตัวอย่างเช่น สมมุติเรามี Button Component อันเดิมจากตัวอย่างก่อนหน้า เราสามารถ implement HOCs ชื่อ partiallyApply ได้ดังนี้
export const partiallyApply = (Component, partialProps) => {
  return (props) => {
    return <Component {...partialProps} {...props} />;
  };
};
ทำให้เราสามารถสร้าง Button หลาย ๆเวอร์ชั่นได้โดยการส่ง partialProps เข้าไป
export const DangerButton = partiallyApply(Button, { color: 'red' });
export const BigSuccessButton = partiallyApply(Button, {
  color: 'green',
  size: 'large',
});
ผลลัพธ์ที่ได้ก็จะเหมือนกับแบบ Component composition
